Posted on

Freediving in Canada vs Tropics


With freediving gaining popularity recently there is also a dangerous trend that must not be ignored.

Thera are much more freediving instructors available nowadays and more people are jumping on a “Look, I am a freediver now” bandwagon. Who would resist looking cool posing amongst corals and big marine mammals on Instagram or FB with no scuba tanks?

Resorts and diving centres offer freediving courses all over Caribbean and Tropics all over the World. Dive centres accept certified freedivers for dive trips alongside scuba folks if you flash your freediving C-card. All seems to be going in the right direction. But…

Same certified freedivers come back home to Canada and now venture in very-very different environment.

Fresh water, cold water, less visibility to name a few.

All of a sudden 7 mm wetsuit is needed (and not always freediving suit, but clumsy rental scuba wetsuit).

Fins that were flexible and easy to swim in +30 degree water become stiff like a plywood.

Excessive extra weights are often put without checking safe buoyance and nylon weight belts are used instead of rubber.

Cold water troughs off equalization, cold contractions increase risk of lung squeeze, bulky suit and rigid fins increase workload dramatically and all of a sudden certified freediver can not “duck dive” any more, can not descent below 10-15 feet or does it with tremendous effort, stressing out and risking blackout.

Adding to the problem is often less than adequate educational process. It is not uncommon to hear that freediving certification was done on a weekend, sometimes with just one day in open water (warm tropical water that was!) “Freedivers” lack basic skills like “duck dive”, line orientation, buddy communication, properly weighing themselves, safety technique etc.

If you got certified “down South”, please spend another day (at least) with Freediving Instructor in Canadian open waters

Posted on

Freedive Toronto on Citytv’s Breakfast Television

Toronto, Friday August 5, 2011
It was an early rise for the Freediving National Championships organizers, crew and athlete this morning as they appeared in today’s Breakfast Television show with Sangita Patell and the LiveEye crew at the Etobicoke Olympium Pool. Under the watchful eye of Freedive Toronto President and AIDA Instructor Doug Sitter, Sangita faced her long-standing fear of water and attempted a breath-hold performance called static apnea, which is a discipline of freediving done on one breath of air, face down in the water without the exertion of movement. This discipline is measure of time spent on a breath-hold (also called sportive apnea). For a first timer, Sangita did really well in her attempt, reaching a personal best of 56 seconds.

[youtube=http://www.youtube.com/watch?v=VYK3FTlnVqA]

Posted on 5 Comments

Making a Freediving Neck Weight

We often get asked about neck weights and I recently needed a heavier neck weight so I decided to create this post to show how to make one.

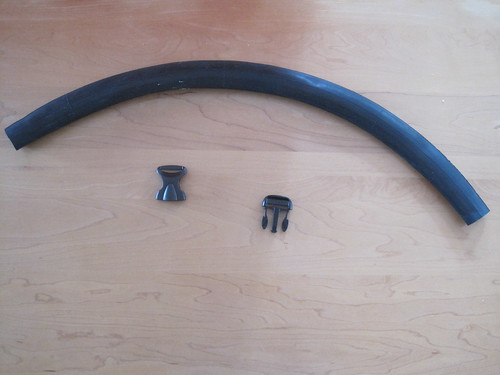
Below are two images showing the supplies needed.

01 Neck Weights - Supplies

02 Neck Weight - Lead Pellets

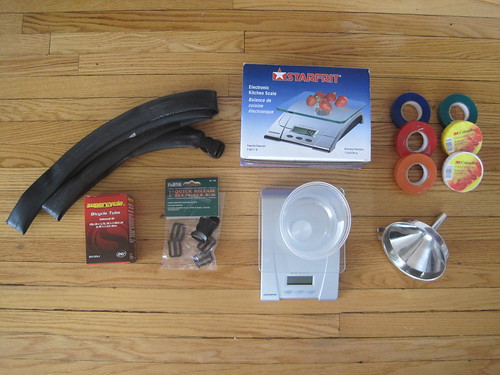
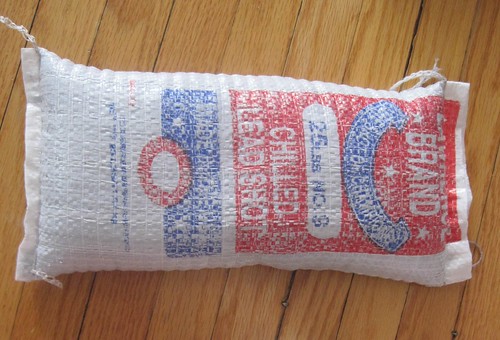
The bag of lead pellets can be purchased at Bass Pro Shop or most other hunting stores. I bought a 25 lbs bag of very small pellets, but you might be able to find a store that carry smaller bags or maybe a dive shop that carry lead pellets. Bass Pro Shop also has the 1 inch buckles I used for my neck weight. I find 1 inch big enough to open even with cloves on and it isn’t as bulky as some of the larger buckles.

The scale, funnel and inner tube was purchased from Canadian Tire and the tape is from Home Depot. Only one color tape is needed, but I just wanted to show all the cool colors available.

03 Neck Weight - Hose and - buckles

The length of the bike tube should be the length of your neck circumference plus 20 cm. My neck is 40 cm and I cut off 60 cm of tube, which worked out nicely.

The thickness doesn’t matter as much, because the tube will expand, but I did made sure I didn’t buy a racing tire, which is very thin. The inner tube I bought can be used for a range of tire widths, ranging from 1.75″ to 2.125″.

04 Neck Weight - Buckles

There are a few ways of attaching the buckles and I have chosen the simplest solution. I find it has worked well on my last neck weight which has held up great for two years and show no signs of wear and tear. It can be a little difficult to get the tube through the ends of the buckle, but it only took me 5 minutes for the first and 2 minutes for the second buckle. Make sure to do the hardest of the buckles (if they are different) first, because the tube is easier to hold when it is empty.

There is a different way of attaching the buckle shown here from another blog: orangellous.

There are also great tips and discussions about neck weights at the Aida Canada Forums

05 Neck Weight - Weighing

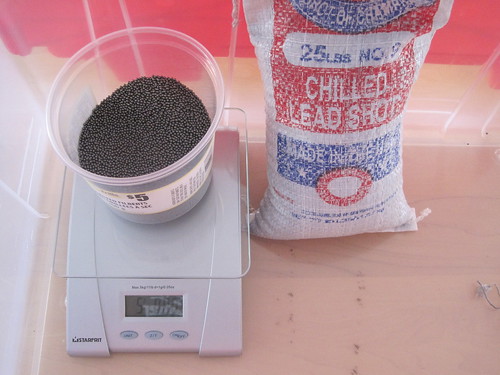
The lead pellets are extremely small and hard to control, so make sure to do all the weighing and filling in a big plastic container. You should get some help from an instructor or experienced freediver with determining how much weight you need both with and without a wetsuit.

06 Neck Weight - Filling

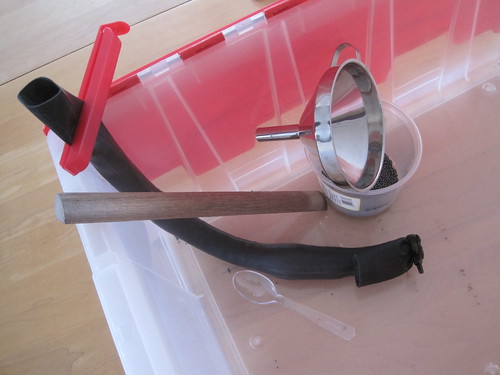
Filling the neck weight would have been hard without a funnel and I also found out that I needed a plunger. I am creating a 5 pound neck weight and all the pellets don’t fit in the tube without stamping them and expanding the tube a bit. I filled up about 10 cm of the bike tube and then used the stick to stamp the pellets. After stamping, the tube will mostly keep the thicker shape and more pellets can be added. I did this in 5 cm increments stamping each time and made sure I had about 15 cm of tube left after adding all the pellets.

The plastic clip was very useful when adding the second buckle. I placed the plastic clip tight to the pellets which allowed me to fairly easily add the second buckle and try on the neck weight for size. The size of the neck weight stretched out was about 47 cm, but bent it was only 43 cm and with tape it finally ended up a little over 42 cm inside.

 The spoon in the picture was used to scoop up a few of the small guys that got away from me.

07 Neck Weight - Before Tape

Above is the neck weight before I taped it and before I shaped it. Make sure to spend lots of time shaping it so it will be symmetrical and  isn’t too thick in the sides. If you make it too thick in the sides it can be harder to get your arms correctly above your head for streamlining.

08 Neck Weight - Finished

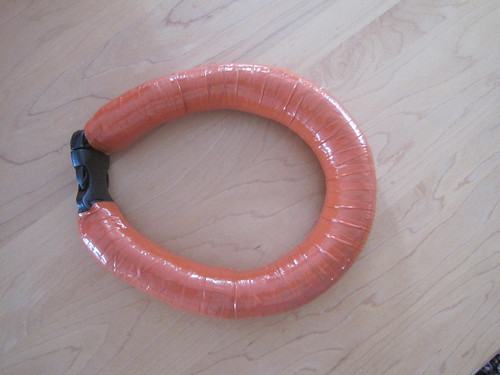
This is the final look of the neck weight with two layers of tape. I added two layers to make it as strong as possible and make sure none of the little pellets have a chance to get out and so water can’t get in.

This is almost identical to my previous neck weight which has been great so far. I will be using it for our freedive practices when I don’t wear a wetsuit.  I will be creating a heavier neck weight for when I wear a wetsuit.

I hope this will help you make your own, but I will also be posting these neck weights for sale, because several people have said that they prefer to buy them instead of making them.

Posted on

Simon Bolivar Pool

The first practices at the pool have been eye opening. We have been shown a basic techniques that I think will raise our play to the next level. We are making notes to hopefully pass this on to our club members back home.

The pool facility is beautiful with the Mountains in the background. The water is 28 deg. C and crystal clear. The air temperature and breeze is a real problem for people when they get out of the pool. Some team members are using space blankets to keep warm when the sub out. The change rooms are very small for such a large facility. Yes, being at an altitude of 2640 m does effect the recovery breathing.

Posted on 1 Comment

Bogota Columbia – Underwater Rugby

We have arrived in Bogota!

Three of us from Ontario have made the trip to Bogota to compete at the Columbian National Underwater Rugby Competition. The tournament is being held at Simon Bolivar Swimming Pool Complex. We have joined a North American composite team made up of 5 Canadians and 7 US players.

This is a short video I found explaining Underwater Rugby
[youtube=http://www.youtube.com/watch?v=5fen7bv4Sys]

If you are interested in additional information:

Bogota Underwater Rugby Club Home Page:
www.castoresrugbysub.com

Local News Report on Underwater Rugby:
www.colombianews.tv/news/101210-bogota-underwater-rugby

Posted on

Vancouver Freedive Fest 2010

We have arrived in Bogota!

Three of us from Ontario have made the trip to Bogota to compete at the Columbian National Underwater Rugby Competition. The tournament is being held at Simon Bolivar Swimming Pool Complex. We have joined a North American composite team made up of 5 Canadians and 7 US players.

This is a short video I found explaining Underwater Rugby
[YouTube=http://www.youtube.com/watch?=5fen7bv4Sys]

If you are interested in additional information:

Bogota Club Home Page:
http://www.castoresrugbysub.com/

Local News:
http://www.colombianews.tv/news/101210-bogota-underwater-rugby